Spring Boot in Pivotal Spring professional certification (32%).
- Spring Boot Intro (8%)
- Spring Boot Auto Configuration (8%)
- Spring Boot Actuator (8%)
- Spring Boot Testing (8%)
Spring Boot Intro
What is Spring Boot?
Spring Boot is an opinionated framework that helps developers build stand-alone and production-grade Spring-based applications quickly and easily.
The primary goals of Spring Boot
- Provide a radically faster and widely accessible getting-started experience for all Spring development.
- Be opinionated out of the box but get out of the way quickly as requirements start to diverge from the defaults.
- Provide a range of non-functional features that are common to large classes of projects, such as
- embedded servers,
- security,
- metrics,
- health checks,
- externalized configuration
- Absolutely no code generation and no requirement for XML configuration.
The key features include:
- Spring Boot starters, easy dependency management
- Spring Boot autoconfiguration, with sensible defaults
- Elegant configuration management
- Spring Boot actuator
- Easy-to-use embedded servlet container support
- ApplicationRunner or CommandLineRunner
ApplicationRunner or CommandLineRunner
Spring Boot allows you to execute code before your application starts. Spring Boot has the ApplicationRunner and the CommandLineRunner interfaces that expose the run methods. Both interfaces offer a single run method, which is called just before SpringApplication.run(…) completes.
CommandLineRunnerexposes thepublic void(String... args)method$ ./mvnw spring-boot:run -Drun.arguments="arg1,arg2"ApplicationRunnerexposes thepublic void run(ApplicationArguments args)method. if you want to have more control over the arguments, implement this interface.$ ./mvnw spring-boot:run -Drun.arguments="arg1,arg2"
@SpringBootApplication
public class SpringBootSimpleApplication implements CommandLineRunner, ApplicationRunner{

  public static void main(String[] args) throws IOException {
    SpringApplication.run(SpringBootSimpleApplication.class, args);
  }

  @Override
  public void run(ApplicationArguments args) throws Exception {
    args.getNonOptionArgs()
      .forEach(file -> log.info(file));
  }

  @Override
  public void run(String... args) throws Exception {
    for(String arg:args) {
      log.info(arg);
    }
  }
}
What are the advantages of using Spring Boot?
-
Spring Boot starters
These starters are pre-configured with the most commonly used library dependencies so you don’t have to search for the compatible library versions and configure them manually. E.g., thespring-boot-starter-data-jpastarter module includes all the dependencies required to use Spring Data JPA, along with Hibernate library dependencies, as Hibernate is the most commonly used JPA implementation. - Spring Boot autoconfiguration.
Spring Boot configures various components automatically, by registering beans based on various criteria. The criteria can be:
- Availability of a particular class in a classpath
- Presence or absence of a Spring bean
- Presence of a system property
- Absence of a configuration file
For example, if you have the spring-webmvc dependency in your classpath, Spring Boot assumes you are trying to build a SpringMVC-based web application and automatically tries to register DispatcherServlet if it is not already registered.
- Elegant configuration management
- Spring supports externalizing configurable properties using the
@PropertySourceconfiguration - Spring Boot takes it even further by using the sensible defaults and powerful type-safe property binding to bean properties
- Spring Boot supports having deparate configuration files for different profiles without requiring much configuration.
- Spring supports externalizing configurable properties using the
- Spring Boot actuator.
It provides a wide variety of such production-ready features:
- Can view the application bean configuration details
- Can view the application URL mappings, environment details, and configuration parameter values
- Can view the registered health check metrics
- Easy-to-use embedded servlet container support.
It creates a JAR type module and embed the servlet container in the application to be a self-contained deployment unit.
Why is it “opinionated”?
- It follows the “Convention Over Configuration” approach.
- It pre-configures Spring app by reasonable defaults.
- It’s highly customizable
Most of Spring application configuration is based on a common application.properties or application.yml file. If none is specified, it already has those property’s values as defaults.
What things affect what Spring Boot sets up?
- Spring applications need complex configuration
- Spring Boot addresses the problem by eliminating the need to manually set up the boilerplate configuration.
- Spring Boot takes an opinionated view of the application and configures various components automatically, by registering beans based on various criteria. The criteria can be:
- Availability of a particular class in a classpath:
@ConditionalOnClass, on the other hand@ConditionalOnMissingBean - Presence of a system property
- Absence of a configuration file
- Presence or absence of a Spring bean
@ConditionalOnBean,@ConditionalOnMissingBean
- Availability of a particular class in a classpath:
How does it work? How does it know what to configure?
Spring Boot provides many custom @Conditional annotations to meet developers’ autoconfiguration needs based on various criteria, each of which can be used to control the creation of Spring beans.
- A specific class is present in the classpath
- A Spring bean of a certain type isn’t already registered in the ApplicationContext
- A specific file exists in a location
- A specific property value is configured in a configuration file
- A specific system property is present/absent
- Example:
@ConditionalOnClass@ConditionalOnMissingClass@ConditionalOnBean@ConditionalOnMissingBean@ConditionalOnProperty@ConditionalOnResource@ConditionalOnWebApplication@ConditionalOnNotWebApplication
What is a Spring Boot starter POM? Why is it useful?
Starter POMs are that all the dependencies needed to get started with a certain technology have been gathered.
A developer can rest assured that there are no dependencies missing and that all the dependencies have versions that work well together.
All official starters follow a similar naming pattern: spring-boot-starter-*, where * is a particular type of application.
Spring Boot supports both Java properties and YML files. Would you recognize and understand them if you saw them?
Properties
environments.dev.url=https://dev.example.com
environments.dev.name=Developer Setup
environments.prod.url=https://another.example.com
environments.prod.name=My Cool App
YAML
environments:
	dev:
		url: https://dev.example.com
		name: Developer Setup
	prod:
		url: https://another.example.com
		name: My Cool App
The SpringApplication class automatically supports YAML as an alternative to properties whenever you have the SnakeYAML library on your classpath.
Loading YAML
YamlPropertiesFactoryBeanloads YAML as PropertiesYamlMapFactoryBeanloads YAML as a Map.
my:
  servers:
    - dev.example.com
    - another.example.com
Will transfer to
my.servers[0]=dev.example.com
my.servers[1]=another.example.com
Can you control logging with Spring Boot? How?
Spring Boot has no mandatory logging dependency, except for the Commons Logging API, which is typically provided by Spring Framework’s spring-jcl module.
Spring Boot uses Commons Logging internally by default, but it leaves the underlying implementation open.
Default configurations are provided for
- Java Util Logging,
- Log4J2, and
- Logback
By default, if you use the “Starters”, Logback is used for logging.
By default, ERROR, WARN, and INFO level messages are logged. In application.properties add: debug=true to enable debug level logging.
Logging is initialized before the application context, so it is impossible to control logging from using @PropertySources in @Configuration classes.
System properties and conventional Spring Boot external configuration files should be used. Depending on the logging system that is used, Spring Boot will look for the specific configuration files.
The logfile name to use by default by Spring Boot can be configured using the logging.file Spring Environment variable.
Where does Spring Boot look for property file by default?
The default properties of a Spring Boot application are stores in the application’s JAR in a file named “application.properties”. When developing, this file is found in the src/main/resources directory.
SpringApplication loads properties from application.properties or application.yml files in the following locations and adds them to the Spring Environment:
- Externally, in a
/configsubdirectory of the directory from which the application is run - Externally, in the directory from which the application is run
- Internally, in a package named “
config” - Internally, at the root of the classpath
The list is ordered by precedence (properties defined in locations higher in the list override those defined in lower locations). properties in application.yml will override those in application.properties.
How do you define profile specific property files?
In addition to application.properties files, profile-specific properties can also be defined by using the following naming convention: application-{profile}.properties.
The Environment has a set of default profiles (by default, [default]) that are used if no active profiles are set. In other words, if no profiles are explicitly activated, then properties from application-default.properties are loaded.
For example
- you can have
application.properties, which contains the default properties values, -application-dev.properties, which contains the dev profile configuration, and application-prod.properties, which contains the production profile configuration values.- properties that are common for all the profiles are in
application-default.properties.
@Configuration
public class AppConfig {

  @Bean @Profile("DEV")
  public DataSource devDataSource() {  }

  @Bean @Profile("PROD")
  public DataSource prodDataSource() {  }
}
How do you access the properties defined in the property files?
Spring provides the @Value annotation to bind any property value to a bean property.
jdbc.driver=com.mysql.jdbc.Driver
jdbc.url=jdbc:mysql://localhost:3306/test
jdbc.username=root jdbc.password=secret
@Configuration
public class AppConfig {

    @Value("${jdbc.driver}")
    private String driver;

    @Value("${jdbc.url}")
    private String url;

    @Value("${jdbc.username}")
    private String username;

    @Value("${jdbc.password}")
    private String password;
}
Bind a set of properties to a bean’s properties automatically in a type-safe manner.
@ConfigurationProperties(prefix="jdbc") to automatically bind the properties that start with jdbc.*
@Component
@ConfigurationProperties(prefix="jdbc")
public class DataSourceConfig {

  private String driver;
  private String url;
  private String username;
  private String password;

//setters and getters
}
What properties do you have to define in order to configure external MySQL?
- dependencies: Spring boot,and msql
- config properties
In your application.properties file, add:
spring.jpa.hibernate.ddl-auto=none
spring.datasource.url=jdbc:mysql://<dbhost>:<dbport>/<db>
spring.datasource.username=<username>
spring.datasource.password=<password>
spring.datasource.driver-class-name=com.mysql.jdbc.Driver
How do you configure default schema and initial data?
Spring Boot uses the spring.datasource.initialize property value, which is true by default, to determine whether to initialize the database. If it’s set to true, Spring Boot will use the schema.sql and data.sql files in the root classpath to initialize the database.
schema.sqlto initialize the schema (tables, views, etc.)- and a
data.sqlto insert data into the tables.
Spring Boot will load the schema-${platform}.sql and data-${platform}.sql files if they are available in the root classpath to do database initialization. The value for
What is a fat jar? How is it different from the original jar?
Executable jars, known as “fat jars”, are archives containing your compiled classes along with all of the jar dependencies that your code needs to run.
In your project target directory, you should see myproject-0.0.1-SNAPSHOT.jar. This the far Jar. Inside of it, you would see myproject-0.0.1-SNAPSHOT.jar.original. This is the original jar file that Maven created before it was repackaged by Spring Boot.
Spring Boot Executable jars VS uber jars
- An uber jar packages all the classes from all the application’s dependencies into one single archive. The problem with this approach is that
- it becomes hard to see which libraries are in your application.
- It can also be problematic if the same filename is used (but with different content) in multiple jars.
- Spring Boot lets you actually nest jars directly.
- you can run your application as you would any other
- You do not need any special IDE plugins or extensions.
- Executable jars can be used for production deployment. As they are self-contained, they are also ideally suited for cloud-based deployment.
- Spring Boot’s executable jars are ready-made for most popular cloud PaaS (Platform-as-a-Service) providers. These providers tend to require that you “bring your own container”. They manage application processes (not Java applications specifically), so they need an intermediary layer that adapts your application to the cloud’s notion of a running process.
To create an executable jar, we need to have the spring-boot-maven-plugin to our pom.xml.
<plugin>
  <groupId>org.springframework.boot</groupId>
  <artifactId>spring-boot-maven-plugin</artifactId>
</plugin>
Running as a Packaged Application
java -jar$ java -jar target/myapplication-0.0.1-SNAPSHOT.jar- Maven Plugin
$ mvn spring-boot:run - Gradle Plugin
$ gradle bootRun
What is the difference between an embedded container and a WAR?
A Standalone app uses your resources, web app executes on the server, rendering is done on your system.
An embedded container is packaged in the application JAR-file and will contain only one single application.
A WAR-file will need to be deployed to a web container, such as Tomcat, before it can be used. The web container to which the WAR-file is deployed may contain other applications.
Deployable WAR
- The first thing you do is change the
packagingtype.<packaging>war</packaging>in Mavenapply plugin: 'war'in Gradle
-
you need to add
spring-boot-starter-tomcatas the provided scope so that it won’t get packaged inside the WAR file. - Finally, you need to provide a
SpringBootServletInitializersub-class and override itsconfigure()method. You can simply make your application’s entry point class extendSpringBootServletInitializer.@SpringBootApplication public class SpringbootWebDemoApplication extends SpringBootServletInitializer { @Override protected SpringApplicationBuilder configure(SpringApplicationBuilder application) { return application.sources(SpringbootWebDemoApplication.class); } }Now running the Maven/Gradle build tool will produce a WAR file that can be deployed on an external server.
What embedded containers does Spring Boot support?
- Tomcat,
- Jetty,
- Undertow servers.
Use Jettry rather than Tomcat
<dependencies>
    <dependency>
        <groupId>org.springframework.boot</groupId>
        <artifactId>spring-boot-starter-web</artifactId>
        <exclusions>
            <exclusion>
                <groupId>org.springframework.boot</groupId>
                <artifactId>spring-boot-starter-tomcat</artifactId>
            </exclusion>
        </exclusions>
    </dependency>
    <dependency>
        <groupId>org.springframework.boot</groupId>
        <artifactId>spring-boot-starter-jetty</artifactId>
    </dependency>
</dependencies>
Spring Boot Auto Configuration
How does Spring Boot know what to configure?
Spring Boot autoconfiguration represents a way to automatically configure a Spring application based on the dependencies that are present on the classpath.
The Spring Boot autoconfiguration mechanism heavily depends on the @Conditional feature.
- A specific class is present in the classpath
- A Spring bean of a certain type isn’t already registered in the ApplicationContext
- A specific file exists in a location
- A specific property value is configured in a configuration file
- A specific system property is present/absent
The key to Spring Boot’s autoconfiguration is its @EnableAutoConfiguration annotation.
What does @EnableAutoConfiguration do?
It’s a Spring Boot specific annotation. It enables the autoconfiguration of Spring ApplicationContext by:
- scanning the classpath components and
- registering the beans that match various conditions.
Spring Boot provides various autoconfiguration classes in spring-boot-autoconfigure{version}.jar, and they are typically:
- annotated with
@Configurationto mark it as a Spring configuration class and - annotated with
@EnableConfigurationPropertiesto bind the customization properties and one or more conditional bean registration methods.
What does @SpringBootApplication do?
It’s a top-level annotation designed to use only at class level. It’s a convenience annotation that equivalent to declaring the following three:
-
@EnableAutoConfiguration: enable Spring Boot’s auto-configuration mechanism -
@ComponentScan: enable @Component scan on the package where the application is located -
@Configuration: allow to register extra beans in the context or import additional configuration classes
Does Spring Boot do component scanning? Where does it look by default?
-
@ComponentScanor@SpringBootApplicationenables component scanning. -
If no component scanning attribute defined, it will scan only the package in which the class annotated.
-
The base package(s) which to scan for components can be specified using the basePackages element in the
@ComponentScanannotation or by specifying one or more classes that are located in the base package(s)
@SpringBootApplication(scanBasePackageClasses = HelloWorld.class)
public class OrdersDBConfig {}
@Configuration
@EnableAutoConfiguration
@ComponentScan(basePackages = "com.mycompany.myproject")
@EntityScan(basePackageClasses=Person.class)
public class Application {
  public static void main(String[] args) {
    SpringApplication.run(Application.class, args);
  }
}
How are DataSource and JdbcTemplate auto-configured?
DataSource configuration is controlled by external configuration properties in spring.datasource.*. For example, you might declare the following section in application.properties:
spring.datasource.url=jdbc:mysql://localhost/test
spring.datasource.username=dbuser
spring.datasource.password=dbpass
spring.datasource.driver-class-name=com.mysql.jdbc.Driver
Spring’s JdbcTemplate and NamedParameterJdbcTemplate classes are auto-configured, and you can @Autowire them directly into your own beans.
@Component
public class MyBean {

  private final JdbcTemplate jdbcTemplate;

  @Autowired
  public MyBean(JdbcTemplate jdbcTemplate) {
    this.jdbcTemplate = jdbcTemplate;
  }
}
What is spring.factories file for?
the META-INF/spring.factories defined all the auto-configuration classes that will be used to guess what kind of application you are running. It’s the secret behind the auto-configuration.
You need to specify the class that will be picked up by the EnableAutoConfiguration class. This class imports the EnableAutoConfigurationImportSelector that will inspect the spring.factories and loads the class and executes the declaration.
Some events are actually triggered before the ApplicationContext is created, so you cannot register a listener on those as a @Bean. You can register them with the SpringApplication.addListeners(…) method or the SpringApplicationBuilder.listeners(…) method.
If you want those listeners to be registered automatically, regardless of the way the application is created, you can add a META-INF/spring.factories file to your project and reference your listener(s) by using the org.springframework.context.ApplicationListener key.
org.springframework.context.ApplicationListener=com.example.project.MyListener
Spring Boot checks for the presence of a META-INF/spring.factories file within your published jar. The file should list your configuration classes under the EnableAutoConfiguration key, as shown in the following example:
org.springframework.boot.autoconfigure.EnableAutoConfiguration=com.mycorp.libx.autoconfigure.LibXAutoConfiguration, com.mycorp.libx.autoconfigure.LibXWebAutoConfiguration
How do you customize Spring auto configuration?
configuration properties are nothing more than properties of beans that have been designated to accept configurations from Spring’s environment abstraction.
To support property injection of configuration properties, Spring Boot provides the @ConfigurationProperties annotation. When placed on any Spring bean, it specifies that the properties of that bean can be injected from properties in the Spring environment.
Creating a Custom Auto-Configuration
- To create a custom auto-configuration, we need to create a class annotated as @Configuration and register it
@Configuration public class MySQLAutoconfiguration {} - The next mandatory step is registering the class as an auto-configuration candidate, by adding the name of the class under the key
org.springframework.boot.autoconfigure.EnableAutoConfigurationin the standard fileresources/META-INF/spring.factories:org.springframework.boot.autoconfigure.EnableAutoConfiguration=com.baeldung.autoconfiguration.MySQLAutoconfiguration - Auto-configuration is designed using classes and beans marked with @Conditional annotations so that the auto-configuration or specific parts of it can be replaced.
Note that the auto-configuration is only in effect if the auto-configured beans are not defined in the application. If you define your bean, then the default one will be overridden.
What are the examples of @Conditional annotations? How are they used?
The Spring Boot autoconfiguration mechanism heavily depends on the @Conditional feature.
Using the @Conditional approach, you can register a bean conditionally based on any arbitrary condition.
For example, you may want to register a bean when:
- A specific class is present in the classpath
- A Spring bean of a certain type isn’t already registered in the ApplicationContext
- A specific file exists in a location
- A specific property value is configured in a configuration file
- A specific system property is present/absent
@ConditionalOnBean: Matches when the specified bean classes and/or names are already registered.
@ConditionalOnMissingBean: Matches when the specified bean classes and/or names are not already registered.
@ConditionalOnClass: Matches when the specified classes are on the classpath.
@ConditionalOnMissingClass: Matches when the specified classes are not on the classpath.
@ConditionalOnProperty: Matches when the specified properties have a specific value.
@ConditionalOnResource: Matches when the specified resources are on the classpath.
@ConditionalOnWebApplication: Matches when the application context is a web application context.
Spring Boot Actuator
What value does Spring Boot Actuator provide?
The Spring Boot Actuator module provides production-ready features such as monitoring, metrics, health checks, etc. The Spring Boot Actuator enables you to monitor the application using HTTP endpoints and JMX.
Spring Boot provides spring-boot-starter-actuator to autoconfigure Actuator.
What are the two protocols you can use to access actuator endpoints?
If Spring Security is present, endpoints are secured by default using Spring Security’s contentnegotiation strategy.
You can expose data through different technologies, like HTTP (endpoints), JMX, and SSH.
Among all the ACTUATOR PROPERTIES.
management.server.ssl.enabled-protocols= # Enabled SSL protocols.
What are the actuator endpoints that are provided out of the box?
-
The
/actuatorendpoint will provide a hypermedia-based discovery page for all the other endpoints, but it will require the Spring HATEOAS in the classpath. -
/autoconfigThis endpoint will display the auto-configuration report. It will give you two groups: positiveMatches and negativeMatches. -
/beansThis endpoint will display all the Spring beans that are used in your application. R -
/configpropsThis endpoint will list all the configuration properties that are defined by the @ConfigurationProperties beans, -
/docsThis endpoint will show HTML pages with all the documentation for all the Actuator module endpoints. This endpoint can be activated by including thespring-boot-actuator-docsdependency in pom.xml -
/dumpThis endpoint will perform a thread dump of your application. -
/envThis endpoint will expose all the properties from the Spring’s ConfigurableEnvironment interface. This will show any active profiles and system environment variables and all application properties, including the Spring Boot properties. -
/flywayThis endpoint will provide all the information about your database migration scripts; it’s based on the Flyway project (https://flywaydb.org/). This is very useful when you want to have full control of your database by versioning your schemas. I -
/healthThis endpoint will show the health of the application. If you are doing a database app like in the previous section (/flyway) you will see the DB status and by default you will see also the diskSpace from your system. -
/infoThis endpoint will display the public application info. This means that you need to add this information to application.properties. It’s recommended that you add it if you have multiple Spring Boot applications. -
/logfileThis endpoint will show the contents of the log file specified by the logging.file property, where you specify the name of the log file (this will be written in the current directory). You can also set the logging.path, where you set the path where the spring.log will be written. By default Spring Boot writes to the console/standard out, and if you specify any of these properties, it will also write everything from the console to the log file. You can stop your application. Go to src/main/resources/application.properties and add this to the very end:logging.file=mylog.log -
/metricsThis endpoint shows the metrics information of the current application, where you can determine the how much memory it’s using, how much memory is free, the uptime of your application, the size of the heap is being used, the number of threads used, and so on. -
/mappingsThis endpoint shows all the lists of all @RequestMapping paths declared in your application. This is very useful if you want to know more about what mappings are declared. -
/shutdownThis endpoint is not enabled by default.
The only endpoints that are not sensitive are /docs, /info and /health. So, if you want to disable the sensitive feature, you can configure them in the application.properties file.
What is info endpoint for? How do you supply data?
If you added any information about the application in the application.properties file using the info.app.* properties, then you can view it at the http://localhost:8080/application/info endpoint.
info.app.name=Spring Boot Web Actuator Application
info.app.description=This is an example of the Actuator module
info.app.version=1.0.0
How do you change logging level of a package using loggers endpoint?
Spring Boot Actuator includes the ability to view and configure the log levels of your application at runtime.
You can view either the entire list or an individual logger’s configuration, which is made up of both the explicitly configured logging level as well as the effective logging level given to it by the logging framework.
- TRACE
- DEBUG
- INFO
- WARN
- ERROR
- FATAL
- OFF
- null, indicates that there is no explicit configuration.
To configure a given logger, POST a partial entity to the resource’s URI, as shown in the following example:
{
  "configuredLevel": "DEBUG"
}
To “reset” the specific level of the logger (and use the default configuration instead), you can pass a value of null as the configuredLevel.
you can use the /logfile endpoint to view the log file content. Go to http://localhost:8080/application/logfile.
How do you access an endpoint using a tag?
The /metrics endpoint is capable of reporting all manner of metrics produced by a running application, including metrics concerning memory, processor, garbage collection, and HTTP requests.
There are so many metrics covered that it would be impossible to monitor them all. You can narrow down the results further by using the tags listed under availableTags.
For example, you know that there have been 2,103 requests, but what’s unknown is how many of them resulted in an HTTP 200 versus an HTTP 404 or HTTP 500 response status. Using the status tag, you can get metrics for all requests resulting in an HTTP 404 status like this:
$ curl localhost:8081/actuator/metrics/http.server.requests?tag=status:404
{
"name": "http.server.requests",
"measurements": [
  { "statistic": "COUNT", "value": 31 },
  { "statistic": "TOTAL_TIME", "value": 0.522061212 },
  { "statistic": "MAX", "value": 0 }
],
"availableTags": [
  { "tag": "exception", "values": [ "ResponseStatusException", "none" ] },
  { "tag": "method", "values": [ "GET" ] },
  { "tag": "uri", "values": [ "/actuator/metrics/{requiredMetricName}", "/**" ] }
]
}
Add any number of tag=KEY:VALUE query parameters to the end of the URL to dimensionally drill down on a meter. By specifying the tag name and value with the tag request attribute, you now see metrics specifically for requests that resulted in an HTTP 404 response.
To know how many of those HTTP 404 responses were for the /** path? All you need to do to filter this further is to specify the uri tag in the request, like this:
$ curl "localhost:8081/actuator/metrics/http.server.requests?tag=status:404&tag=uri:/**"
{
"name": "http.server.requests",
"measurements": [
  { "statistic": "COUNT", "value": 30 },
  { "statistic": "TOTAL_TIME", "value": 0.519791548 },
  { "statistic": "MAX", "value": 0 } ],
"availableTags": [
  { "tag": "exception", "values": [ "ResponseStatusException" ] },
  { "tag": "method", "values": [ "GET" ] }
]
}
As you refine the request, the available tags are more limited. The tags offered are only those that match the requests captured by the displayed metrics.
Common tags Common tags are generally used for dimensional drill-down on the operating environment like host, instance, region, stack, etc. Commons tags are applied to all meters and can be configured as shown in the following example.
management.metrics.tags.region=us-east-1
management.metrics.tags.stack=prod
What is metrics for?
This endpoint shows the metrics information of the current application, where you can determine the how much memory it’s using, how much memory is free, the uptime of your application, the size of the heap is being used, the number of threads used, and so on.
One of the important features about this endpoint is that it has some counters and gauges that you can use, even for statistics about how many times your app is being visited or if you have the log file enabled. If you are accessing the /logfile endpoint, you will find some counters like counter.status.304.logfile, which indicates that the /logfile endpoint was accessed but hasn’t change. And of course you can have custom counters.
How do you create a custom metric with or without tags?
Ultimately, Actuator metrics are implemented by Micrometer. The most basic means of publishing metrics with Micrometer is through Micrometer’s MeterRegistry.
In a Spring Boot application, all you need to do to publish metrics is to inject a MeterRegistry wherever you may need to publish counters, timers, or gauges that capture the metrics for your application.
To register custom metrics, inject MeterRegistry into your component,
@Component
public class TacoMetrics extends AbstractRepositoryEventListener<Taco> {
  private MeterRegistry meterRegistry;
  public TacoMetrics(MeterRegistry meterRegistry) {
    this.meterRegistry = meterRegistry;
  }

  @Override
  protected void onAfterCreate(Taco taco) {
    List<Ingredient> ingredients = taco.getIngredients();
    for (Ingredient ingredient : ingredients) {
      meterRegistry.counter("tacocloud", "ingredient", ingredient.getId()).increment();
    }
  }
}
$ curl localhost:8087/actuator/metrics/tacocloud
{

"name": "tacocloud",
"measurements": [
  { "statistic": "COUNT", "value": 84 } ],
"availableTags": [

  {"tag": "ingredient",

  "values": [ "FLTO", "CHED", "LETC", "GRBF", "COTO", "JACK", "TMTO", "SLSA"]} ]
}
Without Tag
class Dictionary {
  private final List<String> words = new CopyOnWriteArrayList<>();
  Dictionary(MeterRegistry registry) {
    registry.gaugeCollectionSize("dictionary.size", Tags.empty(), this.words);
  }
}
What is Health Indicator?
This endpoint will show the health of the application. If you are doing a database app like in the previous section (/flyway) you will see the DB status and by default you will see also the diskSpace from your system. If you are running your app, you can go to http://localhost:8080/health.
What are the Health Indicators that are provided out of the box?
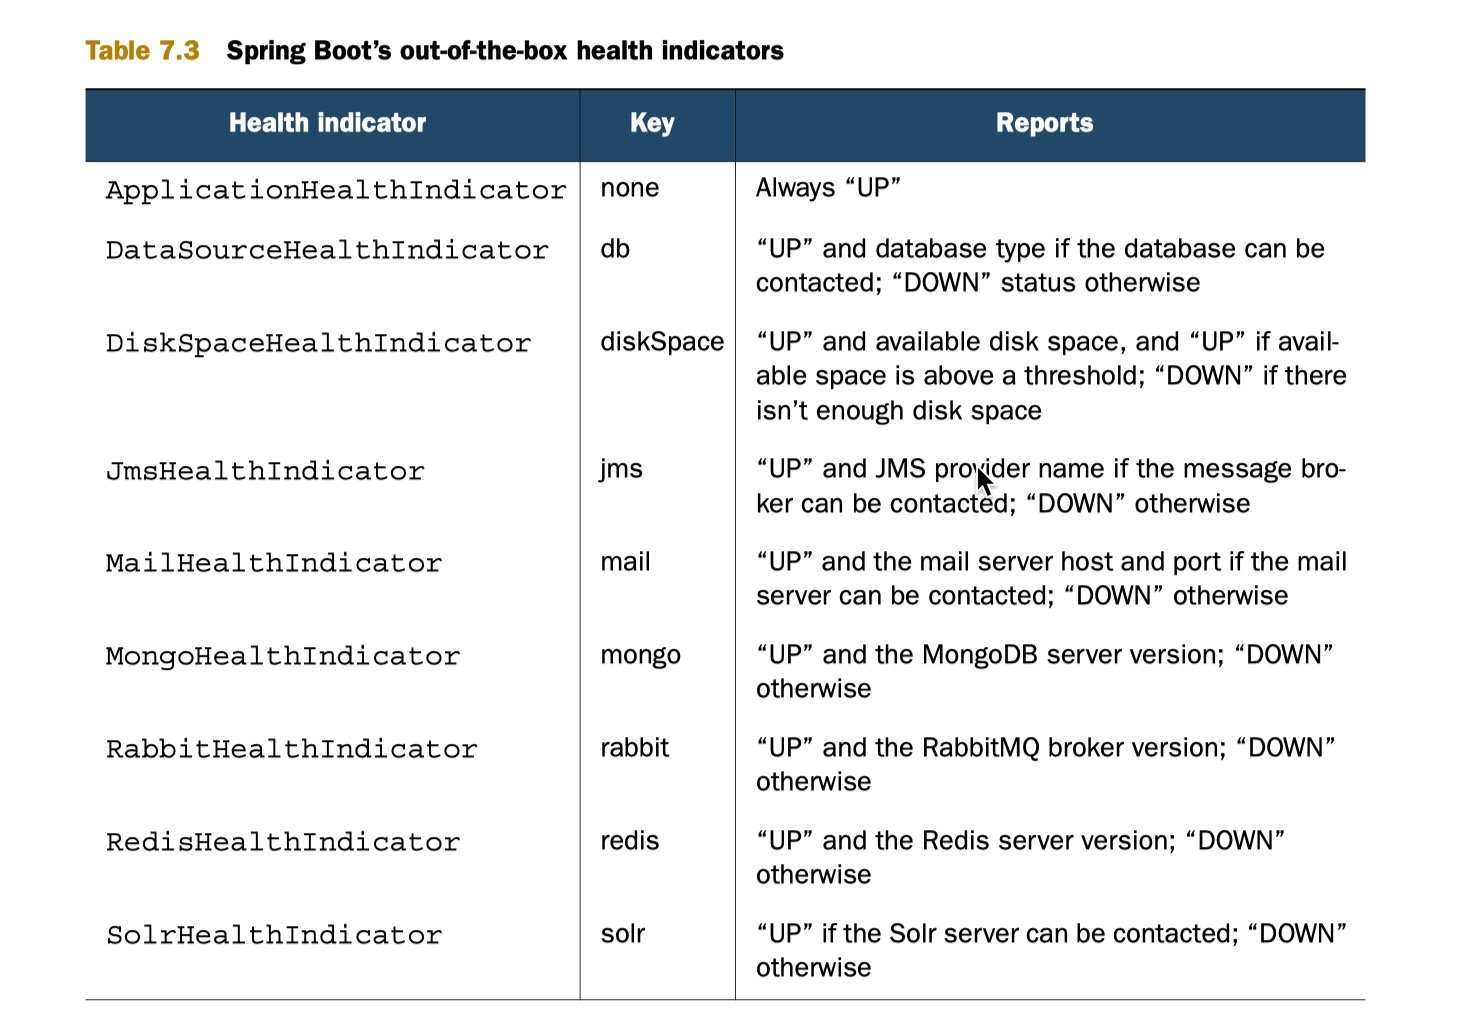
What are the Health Indicator statuses that are provided out of the box
-
DOWNSERVICE_UNAVAILABLE (503) -
OUT_OF_SERVICESERVICE_UNAVAILABLE (503) -
UPNo mapping by default, so http status is 200 -
UNKNOWNNo mapping by default, so http status is 200
How do you change the Health Indicator status severity order?
- Assume a new Status with code
FATALis being used in one of your HealthIndicator implementations. - You might also want to register custom status mappings if you access the health endpoint over HTTP.
management.health.status.order=FATAL, DOWN, OUT_OF_SERVICE, UNKNOWN, UP
management.health.status.http-mapping.FATAL=503
Why do you want to leverage 3rd party external monitoring system?
Spring Boot auto-configures a composite MeterRegistry and adds a registry to the composite for each of the supported implementations that it finds on the classpath.
Having a dependency on micrometer-registry-{system} in your runtime classpath is enough for Spring Boot to configure the registry.
Spring Boot Testing
When do you want to use @SpringBootTest annotation?
the test context framework will be searching for the class annotated with @SpringBootApplication (if no specific configuration is passed) and will use that to actually start the application.
@RunWith(SpringRunner.class)
@SpringBootTest(classes = CalculatorApplication.class)
public class CalculatorApplicationTests {

  @Autowired private Calculator calculator;

  @Test(expected = IllegalArgumentException.class)
  public void doingDivisionShouldFail() {
    calculator.calculate(12,13, '/');
  }
}
What does @SpringBootTest auto-configure?
Spring boot provides the @SpringBootTest annotation to configure the ApplicationContext for tests that use SpringApplication behind the scenes so that all the Spring Boot features will be available.
For @SpringBootTest, you can pass
- Spring configuration classes,
- Spring bean definition XML files,
- and more,
In Spring Boot applications, you’ll typically use the entry point class.
What dependencies does spring-boot-starter-test brings to the classpath?
The Spring Boot Test starter spring-boot-starter-test pulls in
- Spring Test
- Spring Boot Test modules
- JSONPath,
- JUnit,
- AssertJ,
- Mockito,
- Hamcrest,
- JSONassert
How do you perform integration testing with @SpringBootTest for a web application?
//todo
To properly test a web application, you need a way to throw actual HTTP requests at it and assert that it processes those requests correctly. Two options:
- Spring Mock MVC — Enables controllers to be tested in a mocked approximation of a servlet container without actually starting an application server. To set up a Mock MVC in your test, you can use MockMvcBuilders.
standaloneSetup()— Builds a Mock MVC to serve one or more manually created and configured controllers. It expects you to manually instantiate and inject the controllers you want to test, whereas webAppContextSetup() works from an instance of WebApplicationContext, which itself was probably loaded by Spring. The former is slightly more akin to a unit test in that you’ll likely only use it for very focused tests around a single controller.webAppContextSetup()— Builds a Mock MVC using a Spring application context, which presumably includes one or more configured controllers. lets Spring load your controllers as well as their dependencies for a full-blown integration test. ```java @RunWith(SpringJUnit4ClassRunner.class) @SpringApplicationConfiguration( classes = ReadingListApplication.class) @WebAppConfiguration public class MockMvcWebTests { @Autowired private WebApplicationContext webContext;
private MockMvc mockMvc;
@Before public void setupMockMvc() {
mockMvc = MockMvcBuilders
  .webAppContextSetup(webContext)
  .build();    }
@Test public void homePage() throws Exception { mockMvc.perform(MockMvcRequestBuilders.get(“/readingList”)) .andExpect(MockMvcResultMatchers.status().isOk()) .andExpect(MockMvcResultMatchers.view().name(“readingList”)) .andExpect(MockMvcResultMatchers.model().attributeExists(“books”)) .andExpect(MockMvcResultMatchers.model().attribute(“books”, Matchers.is(Matchers.empty()))); } }
2. **Web integration tests** — Actually starts the application in an embedded servlet container (such as Tomcat or Jetty), enabling tests that exercise the application in a real application server.
uses `@WebIntegrationTest` to start the application along with a server and uses Spring’s RestTemplate to perform HTTP requests against the application.
```java
@RunWith(SpringJUnit4ClassRunner.class)
@SpringApplicationConfiguration( classes=ReadingListApplication.class)
@WebIntegrationTest
public class SimpleWebTest {

  @Test(expected=HttpClientErrorException.class)
  public void pageNotFound() {

    try {
      RestTemplate rest = new RestTemplate();
      rest.getForObject( "http://localhost:8080/bogusPage", String.class);
      fail("Should result in HTTP 404");
    } catch (HttpClientErrorException e) {
      assertEquals(HttpStatus.NOT_FOUND, e.getStatusCode());
      throw e;
    }
  }
}
When do you want to use @WebMvcTest? What does it auto-configure?
Spring Boot provides the @WebMvcTest annotation, which will autoconfigure SpringMVC infrastructure components and load only
@Controller,@ControllerAdvice,@JsonComponent,Filter,WebMvcConfigurer, andHandlerMethodArgumentResolvercomponents.
Other Spring beans (annotated with @Component, @Service, @Repository, etc.) will not be scanned when using this annotation.
In contrast to @SpringBootTest, which loads the entire configuration.
@RunWith(SpringRunner.class)
@WebMvcTest(controllers= TodoController.class)
public class TodoControllerTests {

  @Autowired
  private MockMvc mvc;

  @MockBean
  private TodoRepository todoRepository;

  @Test
  public void testShowAllTodos() throws Exception {

    Todo todo1 = new Todo(1, "Todo1",false);
    Todo todo2 = new Todo(2, "Todo2",true);

    given(this.todoRepository.findAll())
      .willReturn(Arrays.asList(todo1, todo2));

    this.mvc.perform(get("/todolist")
      .accept(MediaType.TEXT_HTML))
      .andExpect(status().isOk())
      .andExpect(view().name("todos"))
      .andExpect(model().attribute("todos", hasSize(2))) ;

      verify(todoRepository, times(1)).findAll();
  }
}
You have annotated the test with @WebMvcTest(controllers = TodoController.class) by explicitly specifying which controller you are testing. As @WebMvcTest doesn’t load other regular Spring beans and TodoController depends on TodoRepository, you provided a mock bean using the @MockBean annotation. The @WebMvcTest autoconfigures MockMvc, which can be used to test controllers without starting an actual servlet container.
What are the differences between @MockBean and @Mock?
@Mock
@Mock = Mockito.mock(). It’s a from Mockito library.
@MockBean
- This is indeed a Spring Boot class.
- It allows to add Mockito mocks in a Spring ApplicationContext.
- If a bean, compatible with the declared class exists in the context, it replaces it by the mock.
- If it is not the case, it adds the mock in the context as a bean.
When do you want @DataJpaTest for? What does it auto-configure?
@DataJpaTest and @JdbcTest annotations to test the Spring beans, which talk to relational databases.
-
The
@DataJpaTestallows you to test the persistence layer components, doesn’t load other Spring beans (@Components, @Controller, @Service, and annotated beans) into ApplicationContext. -
Enable transactions by applying Spring’s
@Transactionalannotation to the test class Enable caching on the test class, defaulting to a NoOp cache instance -
Autoconfigure an embedded test database in place of a real one Create a TestEntityManager bean and add it to the application context
-
Regular
@Componentbeans are not loaded into the ApplicationContext.
@RunWith(SpringRunner.class)
@DataJpaTest
public class UserRepositoryTests {

  @Autowired
  private UserRepository userRepository;

  @Test
  public void testFindByEmail() {
    User user = userRepository.findByEmail("admin@gmail.com");
    assertNotNull(user);
  }
}